Hey You guys! What a week this has been....I have been busy working on S.R.'s Barbie Birthday Party, and I can't wait to share some picture with ya'll...it is turning out so pretty!!! I will have to say that I am a LOT less stressed since the party is smaller...and I started decorating on Monday:o) Next week will be nothing BUT Barbie Party posts:o)
btw....
S.R. IS 3 TODAY:O)
HAPPY BIRTHDAY BABY GIRL!!
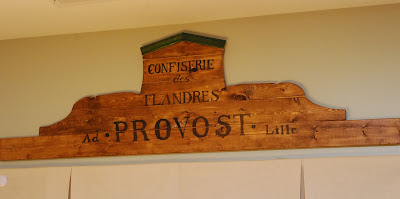
For those of you who weren't able to see my guest post at Infarrantly Creative last week, here is the tutorial of the Provost Plaque...and for those of you who want to know what this sign means....this is a replica of an antique French pastry shop sign.
So here goes...
So anyway, I started thinking about what I would want to share with you guys, and it didn't take me long to decide on a knock-off version of the Ballard Designs Pruvost Plaque. I have been drooling over this plaque for ages, and knew that I could make it. I just needed the proper motivation...i.e. guest posting:o)
Here is a picture of what Ballard's looks like:
And here is what mine looks like:
(please pardon the lighting. It was overcast and towards the end of the day)
The dimensions of Ballard's plaque was too large for the space above my kitchen windows, so I scaled it down a bit.
This project cost just under $30....and Ballard's is $249.
I am not a woodworker. I leave all woodworking up to my husband. Every time I try a new project involving wood, it is always a COMPLETE FAILURE. However, I completed this entire project by myself!!
Here's what you need:
3- 1x4x6 Pine Boards($10.38 total)
1/2 Pint of Dark Walnut Stain ($5.19)
3 Packs of 3" Mending Brackets($7.11 total..comes in a 4 pack)
Accent Trim piece($6.18)
Wood Glue(on hand)
Picture hanger(on hand)
Acrylic Paint-Black and Green (on hand)
Cutting tools(saw, jig saw)
Screw Driver
I started out by cutting all the boards on our miter saw.
1st Board=12" wide
2nd and 3rd Board=36" wide
4th Board=46" wide
Bottom Board=60" wide
These next few steps are done on the BACK of the boards.
I drew a line on the end of each board to help me keep the boards centered.
Once all the boards were lined up, I attached the mending brackets in the center.
I took a couple of sheets of paper and taped them together and made a template. I cut it out and taped it to the boards and traced it with a pencil.
This is what the back looked like before I cut the boards with my jigsaw.
I went ahead and put my first coat of stain on before using the jigsaw.
Next comes the really fun part, using the jigsaw. I didn't get a picture of this step because I was a little busy:o)
Once the entire plaque was cut out, I started on the trim. I didn't want to have to fuss with nails and wood putty, so I just used wood glue to attach the trim.
The letters are just freehand. I drew them out with pencil first, and went back with the Black acrylic paint.
Close up of the letters
Once I got all of the letters painted on, I put my second coat of stain on, and I painted the trim green. I also dirtied up the the green paint with a little bit of stain.
And there you have it.
This project was really easy, and very, very inexpensive.
I hope you enjoyed this post. Feel free to stop by Fussy Monkey Business anytime!!


8 comments:
You sign turned out lovely. The mending brackets are wonderful. I'd have never thought to use those.
This turned out great. I use the mending brackets a lot when making larger signs. I have painted signs for 10 years now and I still need the help of my printer to get the lettering to look decent. I envy your ability to just sketch them out.
Oh my goodness, you recreated it exactly!!! I'm so impressed.
Kelly
You did a great job- this is also a super tutorial! It looks exactly like the catalog pic. Bravo!
I have been wanting one of these and trying to figure out how to make one cause well you know the price!:) Thanx for the tutorial and girl your freehand is awesome!
This is one of my fav BD items, yours looks even better than theirs, price is perfect too!
Really great job!
You are amazing! That turned out awesome!
Post a Comment