Showing posts with label painting. Show all posts

Wednesday, May 18, 2016

Old Sewing Machine Table turned Outdoor Planter


Hey Y'all! I am back after a two'ish week break. I needed to focus on healing.
I developed shingles, and let me tell you...that's stuff is NO JOKE!
Thankfully, it's passed, and I have learned so much about myself and how I handle stress (actually how I don't handle it.)
I am taking baby steps, and learning to say no, and learning to just breathe.
It's SOOO hard y'all!

Anytime I am on the mend from an illness, I always have the urge to get up and do something. I don't do well sitting still, but sometimes life knocks you down and you have to listen to your body.
I had plenty of time to dream up different projects with all of that sitting I was doing with those nasty shingles.
So as soon as I was feeling up to it, I was out in the garage tearin' things up.
I had an old empty sewing machine table sitting in my attic that was given to me by one of my mother's friends. I knew I could do something with it, but I just didn't know what.
So it sat in the attic for more than a year.
Hubby kept trying to make me get rid of it because it was taking up space, but I refused. 
I am so glad I didn't throw it out.
I finally came up with a fun way to repurpose the table.
I turned it into an outdoor planter.
This was its original state.
Sans sewing machine.
I used the wood from the stand my porch swing used to hang from, and created a box to slide inside the table. Building the box took 40 forevers!
I went with my tried and true Krylon red. This was the first time for me to use this all-in-one paint and I LOVE it. It was super easy to use!
I made sure to drill a few holes in the bottom of the planter for drainage.
I also roughed up the top with my orbital sander, just to knock off the sheen.
Two coats of spray paint, and she was ready for assembly.
I used the plastic that Lowe's gives you for your car to protect the floor mats as my liner for the planter. Dual purpose, and it was free!
I had some leftover dirt from some previous plantings, and it was just enough. Lucky me!
I also poked holes through the plastic for drainage.
I made sure to get shade tolerant plants, since they would be under a covered porch. I always seem to ignore the suggestions on those little plant tags. 
You know what? Those people from the plant stores kind of know what they're talking about, so I chose to listen this time :-)
I love the varying heights of the plants.
I can't wait until they fill in a little more.
This was an inexpensive build, and I was only out the cost of spray paint and the plants.
I am so thankful for days when I can create what I imagined. It's so fun!
So, who's ready to make their own? I would love to see pictures if you decide to recreate this piece!!

Wednesday, April 20, 2016

Laundry Room Renovation-Part 3

 I'm so glad you're back! 
In my last two posts, I shared with you our thought process in creating a more functional laundry area, and the beginning stages of building out the cabinetry.
Today, I am sharing the current progress of this space.
 The doors and hardware have been added to the enormous cabinets. (SOOOOOO much storage space!!!)
All of the cabinetry and trim have been painted and the counter top and bench have been stained.
And part of the crown molding has been added.
 Hubby installed a white subway tile back splash under the cabinets.  It's one of my favorite parts of the whole laundry room at this point. It offers absolutely no function other than being aesthetically pleasing, but sometimes that's ok, right?
You will have to forgive the over exposure of the back splash. The under cabinet lighting kind of washes it all out. 
Speaking of under cabinet lighting...we found an inexpensive light at Costco, and hubby installed it under the cabinets. I love how much it brightens up the room! It kind of makes folding laundry less depressing.


(click on the picture to find similar under cabinet lighting)

One of our concerns with the laundry room was I didn't have an area to stick ALL of the dirty laundry. This laundry tower solved those issues.
If you remember, I found my inspiration from this picture.
It is amazing to have so many baskets to sort all of my laundry in.
I really wanted to use wicker baskets, but it just wasn't in the budget, so we went with a Sterilite square laundry basket. Even though the wicker would have been much prettier, these baskets are clean and neat looking, and they definitely get the job done. They also fit the dimensions of our cubbies perfectly. 
Amazon had a great deal on the baskets, so we had them shipped in.

(click on the picture to get your own 6-pack of laundry baskets)

There are still soooo many things left to do in this room. Our list includes:

Adding wainscoting to match the Half Bath
Paint the walls a soft grey
Add crown molding and caulk
Add new light fixtures
Reconfigure the salon area
Add a little decor to finish it off

I'm sure that before it's over with, I will be adding to that list.
Everyone who has been in the laundry room lately has raved over it. Hubby and I are anxious for it to be complete. It seems like we have been working on it FOE-EV-UH!

I will keep you posted on any new updates we do to this room, so make sure to check back!


*This post contains affiliate links*

Monday, April 18, 2016

Laundry Room Renovation-Part 2


In my last post, I shared with you all the issues I had with the different layouts of our laundry room. In the course of 6 and a half years, our laundry room has gone through several different looks, but never meeting all of our needs.
After searching for inspiration for what seemed like weeks(which in all actuality was probably more like days...maybe even hours), I finally came up with a design plan. 
I felt like an HGTV designer with my own show. It was kind of cool.
My design addressed all of the issues we were having with the space. We have 9 foot ceilings, so by taking the cabinets all the way to the ceiling, it would create a ton of extra storage. Making the laundry tower for holding baskets would clear out the dirty laundry on the floor, with multiple slots for all of my sorting needs. We would also have a seating area where my clients would be able to sit, and the dogs' crate could be tucked away underneath. And, most importantly, it would be "purty."
 Problems solved.
I just needed someone to build it for me. Thankfully I have a handy dandy hubby.


We started out by completely deconstructing the laundry room...again.


Then hubby got to work making my dreams a reality. He began with the counter over the washer and dryer. He used oak plywood  for the counter top, and took it all the way to the back wall. It's massive and I love it, mu-wha-ha-ha! I wanted the counter to be stained, so that's why we went with a slightly more expensive plywood.
He tried to end all construction at this point, but obviously that was step 1 of 6,453.
Next, he made the tower. Now, wood only comes in 8 foot sheets at Lowes, and we have 9 foot ceilings, so he made the entire 8 foot tower, and later on added a box on top of the tower, so it would go all the way to the ceiling.
Now that the tower is beside the counter, there isn't any risk of laundry going MIA.


He then built the cabinets that go over the washer and dryer. This was something that truly tried his patience, and broke the tip of my finger, but they made it on the wall, so all is well.
The laundry room stayed in this state for a bit because we went on our amazing Disney vacation that I can't wait to tell you about!
 When we returned, hubby was back in the garage working his fingers to the bone to make Momma's dreams come true. 

Stayed tuned, and I will update you on the current progress. This room is still under construction, but it's starting to look beautiful!!

Monday, December 15, 2014

Cookie Monster Mug Tutorial

It's crunch time, y'all. Christmas is in 10 days!!! I am working like a crazy person trying to get all of my last minute gifts together. I hadn't planned on it, but most of my gifts are handmade.
Which is really fun!!
One of my gifts I am giving is a Cookie Monster Mug.
This little mug was so much fun to make, and really cute, I think!
I was going to purchase one, but decided I could do it myself.
All of the supplies were purchased from Walmart.

You need:
-One blue mug
-White Oil Based Sharpie
-Black Oil Based Sharpie
-Circle stickers for template
-Scissors
-Rubbing Alcohol
-Paper Towels
Absolutely make sure you have OIL BASED paint pens. The oil based paint sticks better.
Hand wash your mug, dry it, and then wipe it down with rubbing alcohol. 
Then, use two large'ish circle stickers and place them where you want the eyes. (Can you tell we homeschool? Never can have too many stickers!!!)
Trace around the circles with the black paint pen. Remove stickers, and realize that stickers were placed in the wrong spot. Use rubbing alcohol and paper towels to remove said mistake. If you'd like, you can skip this step altogether :-)
Over lap the stickers like the picture below. Trace around the stickers with the black paint pen.
Allow the paint to dry just a few minutes and then remove the stickers. 
You can draw the mouth on next if you'd like.
Fill in the black circles with the white paint pen. It will take several coats of the white, so color in, and then give it a break. Come back in about 10 minutes or so, and reapply the paint. It's sort of like painting your nails. You can't reapply immediately.
Fill in the little pupils, and place in a cold oven on a sheet pan. With mug in the oven, turn it on to 350 degrees and let it bake for 30 minutes. 
Turn the oven off and let it cool to room temperature.
Once it cools, it's ready to gift, or use!

This mug was my inspiration. If you don't have the time to work on a mug of your own, you can click on the photo below and order one for yourself!


***This post contains affiliate links***

Friday, September 27, 2013

Changing Table -Turned Dog Bed

A couple of weeks ago, I ran across a beat up, run down changing table on the side of the road. It was no longer safe to put a baby on. It was missing two shelves, and was super rickety. Because it was made of real wood and had interesting spindles, I felt the need to bring it home and make something out of it.
The hubs was obviously unhappy that I was bringing more junk home;o) Story of our lives, right?
Anyway, I thought it would make a perfect pet bed.
 This is how it started out. 
I used an electric hand saw and chopped the legs off. That was definitely an experience. Note to self...use a sharp blade next time. I was literally shaking so hard that I had blurred vision while cutting this piece because the blade wouldn't cut through the wood:o) 
I sanded down the feet to get a nice edge.
I then ripped the safety buckles off of the bottom.
And then spray painted it.
The cushion is made from painters' canvas and two large pillows from my couch in the bonus room.
I made the cover removable by adding a zipper to the back. That way when it gets dirty, I can just throw it in the wash.
Not bad for a roadside rescue?

Monday, September 16, 2013

Coffee Table Redo-Part3

Our coffee table serves many purposes. It's the place where the kids do homework, make crafts, sometimes eat their dinners. It's also a foot rest, and occasionally used in pillow/blanket forts.
It's used A LOT, and had been showing lots of wear here lately.
This coffee table has gone through a couple of transformations.
To see the actual before, you can go here.
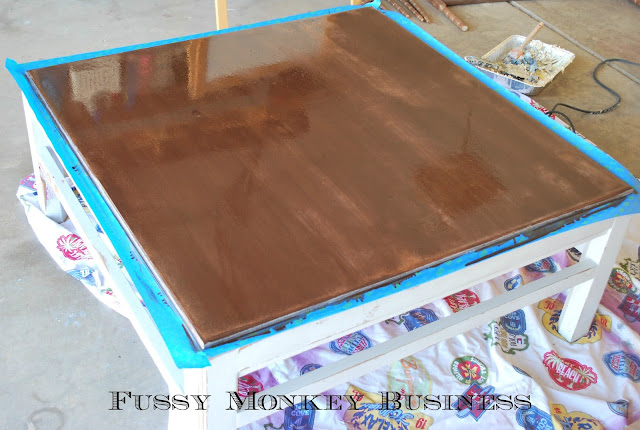
I had not been planning on re-doing the coffee table. It sort of just struck me last Friday that I needed to strip all of the nasty paint off of it. 
This was part two...the center is chalkboard paint. I had found some inspiration on Mrs. Mustard Seed's blog with some chalkboard tables she had created. At the time of the second re-do, my children had a nasty habit of writing on furniture. I came up with what I thought was an ingenious idea to paint chalkboard paint on the top of the coffee table; that way they could have at least one piece of furniture in the house to write on with out mommy fussing.
Well, it's been a few years and the kids are past the graffiti-on-my-furniture phase, thankfully. However, this table has been put through the ringer.
 As you can see there are tons of nicks, and scratches all over the top. There was also this weird film that developed...not exactly sure if it was from the chalkboard paint, or if we're just that nasty.
Regardless, it needed to come off. 
After two coats of paint stripper and a little bit of sanding, I was able to restore the wood to it's natural state.
 I applied the same stain I used for the old bench.
I let the stain sit for 15 minutes before wiping it off. I'm not one for waiting hours to reapply coats of stain to get what I think is basically the same result.
And this is the finished result. A beautiful stained wood top.
A much needed improvement.
I haven't applied the coats of poly yet. We had way too much going on over the weekend to get that done.
I love my big coffee table, and love that it serves so many purposes. Styling it, is an issue all on it's own. Because it has so many jobs, leaving things on it isn't an option.
But, the kids and the hubs are away, so mommy gets to play around with some fun styling:o)
 I love these old Bibles. I think they are so beautiful. The thicker ones belonged to the hubs' grandfather. The smaller one was my mother's cousin's Bible that was given to him when he was fighting in the war. They were to put them in their pocket to figuratively and literally protect their hearts.
Definitely a treasure.
 I can't get enough of these old blue mason jars either.
I have them scatted throughout the whole house. 
I have three more projects that I am in the process of finishing. I can't wait to share them with you all!!


Wednesday, September 11, 2013

Bicycle Art

It seems like ages ago I told you that I would have a fun little art project for S.R.'s room. Well, I finally got around to making one.
I just needed the right inspiration!
I wanted to do something with a bike, but just wasn't sure what. I came across this really cute vinyl cruiser on Etsy , and knew it was exactly what I needed.


And this is what I came up with.
FrogTape makes a chevron painter's tape. Crazy! I know!
 It's super easy to use! 

I found some at Lowes the other day, but you can also purchase it from Amazon. 
Click the link below and it will take you directly to Amazon.

                               
The tape isn't recommended for use on textured surfaces...says so right on the box. As you can see below, my canvas is a textured surface. I went with it anyway because sometimes you can bend the rules a bit in the crafting world. 
I used a scrap piece of tape to keep my lines even.
Once all of the tape was down on my canvas board, I smoothed out all of the edges, painted, and promptly removed the tape.
After letting the paint dry for about 30 minutes, I placed the vinyl bike on top of the painting.
You have to be patient with vinyl. It can tear easily, and can stick together if you don't follow the instructions.
Once in place, I smoothed it out to make sure there weren't any bubbles.
I had the large frame on hand. I was actually using the frame as a Christmas card holder. However, last year, the cards never made it to the frame. 
So I figured I would make good use out of it, paint it purple, and hang it in S.R.'s room.
I don't normally do anything with colors this bright or go with things that are this contemporary because it's not my style. I'm more of a classic style kind of girl.
However, it is S.R.'s style...so I'm goin' with it;o)


***************************************************
Disclosure: This post contains Amazon affiliate links. By clicking on said links, you help me make money. It wouldn't hurt my feelings a bit if you decided to click and buy;o)


Photobucket

Craft Dictator