Showing posts with label knock offs. Show all posts

Tuesday, January 6, 2015

Ballard 'Burlap Message Board' Knock-Off Tutorial

 I hope you all had a wonderful Christmas holiday. 
Ours was filled with family, friends, and lots of travel. We had a wonderful time, but we are definitely glad to be back on a schedule. 
We started school yesterday, and it's nice to have the whole day planned out. 
We took the entire month of December off because we started school so early, so there wasn't any rhyme or reason to most days before Christmas...just maxin' and relaxin'. 
Since I had so much time on my hands, I was able to get a few projects knocked out.
Outside of being a full-time stay at home mom, I am also a licensed hair stylist. I have a little spot set up in the laundry room with a shampoo sink, and I occasionally get to use my stylist skills.
I am in the process of getting my laundry room turned into an "at-home" salon. My goal is to make it look less like a laundry room and more like a salon...however, the big fat washer and dryer still make it look like one;-)
Budget and time are big factors right now, so I can't do the major renovations I want to do, so I have been doing small projects to make the space a little more decorated.
I am really excited to share with you one of my latest projects. 
It's a Burlap Message Board.
I found my inspiration from the Ballard Designs catalog.

This project took around an hour, and I will have to say, I couldn't believe how easy it was.
And, it was super cheap!

Are you interested in making one for yourself?
Here are the supplies you need:
Cork board(found mine at a yard sale for $2)
Quilt batting(had some on hand)
Burlap(purchased mine from Hobby Lobby with 40% off coupon)
Brass Tacks(they were $1.99 at Hobby Lobby)
scissors
hammer
low temp glue gun(a must!!)
glue sticks
picture hanger for back

I loved the little gold flecks in this burlap. 
If I spot something sparkly, it usually ends up in the cart:-)
Let's get started!
You want to wrap the batting along the front of the cork board.
You'll flip it over, and glue the batting to the sides of the frame.
 It should look a little something like this when you are finished.
 Trim the excess batting all the way down to the frame. You won't want the extra bulk when wrapping the burlap.
 Next, lay the board on top of the burlap. 
 This process is similar to recovering a cushion on a chair. You will start on one side and glue the burlap down to the back of the frame(not the sides, like the batting). This is why you definitely want a low temp glue gun. Your fingers will thank you!!
Once you have one side glued down, then you will glue the opposite side, making sure to pull tightly.
Repeat on all sides.
 Your corners will be sticking up, so just put a glob of glue in the corner and mash.
Make sure it's LOW TEMP or you will burn your fingers to bits.
 When all sides and corners are glued down, you should have something that looks like this.
 Next come the tacks. I measured here and there, but they are by no means perfect.
 I measured just enough so that they wouldn't be too wonky.
Just start hammering away until you get the desired look.
 The last step is to add the picture hanger on the back. You will definitely want a more precise measurement for this step so that it will hang level.
And this is the end result!
I love the result, and it does a great job in covering two massive holes in the wall that will be fixed...someday:-)
Let me know if you decide to make one too. I'd love to see what you come up with!


Friday, August 31, 2012

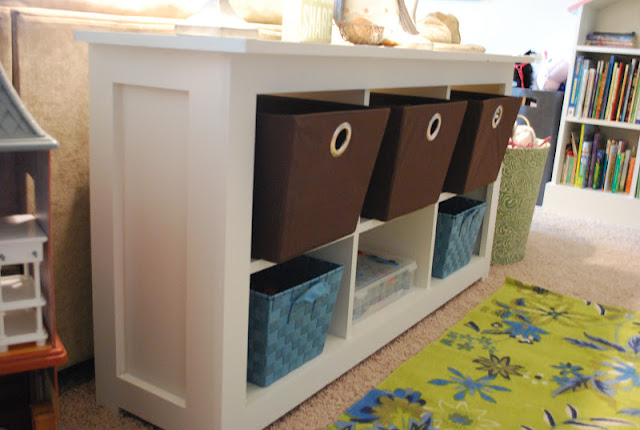
$4 Console Table

I told you a few weeks back that the hubs was working on some built-ins...well, he has been doing a great job on them!  Since he was in the building mood, he decided to make a console table with all the scrap MDF he had laying around to hold extra toys. We found our inspiration Here..there were plans, but we didn't have enough MDF to make the exact same table, so there was some improv building. The reason it's a $4 table is because I had to make a quick trip to Lowes to get one 1x3 board. 
I helped a little(held things in place, painted, moral support), but he was definitely the brains behind the job:o) I'm so proud of my little handy man:o)
The canvas baskets came from T.J. Maxx. 
The rug is from Marshalls.
I found this cute little owl and the sign at Marshall's too.
 Lamps and lamp shades(clearance find) from Walmart.
 And here are the beginnings of the built-ins. We recycled our entertainment center, and attached it to the wall. Then the hubs made the window seats. He finished it out with trim across the bottom. Eventually there will be more added on, and the whole thing painted white, but right now he needs to focus on his thesis.
 Hasn't he done a fantastic job?!? 
 I hope that you all have a wonderful holiday weekend. We have ours filled with food, football, friends and family...it doesn't get much better than that!

Participating here:


Furniture Feature Fridays


Sunday, May 8, 2011

Pottery Barn's Hadley Ruched Duvet Knock Off

I hope that you all had a wonderful Mother's Day.  S.R. has a sinus infection right now, so things have been a little off kilter around here.
I still haven't been able to use my chalk paint yet, but I am really looking forward to it:o)
 I did get the chance to finish a project that I have been working on.
A couple of weeks ago the Pottery Barn catalog came in the mail. I always get excited when those things come because they have so many beautiful things in them. 
When I saw the Hadley Ruched Duvet Cover, I wanted it....badly. Isn't it beautiful?
Photo Credit: Pottery Barn
I really wanted it for MY bed, but the hubs and the color white aren't on good terms, so I knew that having it in our room was a no-go:o/ The guest room needs a makeover, so I decided to put it there.
I knew that this was something that I could make. Pottery Barn sells this duvet cover for $179.00. That's just the cover...if you don't have a duvet, then there is another added cost. So after studying the picture for a few days, I figured it out, and I was able to make mine for $75...that's INCLUDING the purchase of a duvet($24.99 King Size at Target):o)
Here's mine:
Want to know how I did it?
Here's what you need:
3 King size Flat sheets(this is for a queen bed)-$15 each at Walmart
4 or 5 packs of 1" wide Twill tape- around a $1 each...I think...(you could also use bias tape here)
White thread
Pins
Scissors

To begin.....
Wash and dry all 3 sheets.  
Cut the tops of the sheets off.
See picture:

Take 2 sheets and stitch cut ends together. Press open seam. 

This next part was a tad tricky for me in the beginning. I thought I would try to measure everything out to figure where I needed to have the long baste stitch lines, but it proved to be more of a hassle, sooooo

I folded the sheet in quarters lengthwise(in half, then halvsies again) and stretched it down the hallway to make sure that everything was folded correctly and smoothly. 
Press down all of the edges with a HOT iron using your steam. These lines will be your guide for your stitch lines.
Head to your machine, and use a basting stitch the entire length of the sheet. You will do this 5 times. 3 for the interior lines and 1 vertical line on either side of the outer edges.
You will be covered in fabric:o)
Once all of your lines have been sewn, you will need to start gathering. Find the little string on the end and start pulling. This takes FO-EVUH because you have to be careful not to break the string.
Lay it across the 3rd sheet and make all edges match up with the bottom sheet. You want to try to keep all of the gathers even.


Get your twill tape out and start pinning it across your stitch lines. Make sure to get your pins fairly close so that the gathers will not loosen when you pick up the top.
Stitch the twill tape down one side and them the other side.
Lay your finished top back on the 3rd sheet face down. Pin around the perimeter.

Make sure to leave a gap so that you will be able to insert your duvet later.
Stitch the perimeter.
Turn right side out and insert duvet. Fold in edges of opening, pin, and stitch.
Then you are done:o)

Pottery Barn's version has button holes for easy removal, but since this bed will not be used a lot, I am not worried about removing the duvet.

This project is fairly simple, but can be daunting with the amount of fabric you have to deal with.
I would say this project is for intermediate to advanced sewers.

So what do you think?

Is it a keeper?
It's totally girly:o)
It just needs some really cute pillows to match....thinking those will be purchased;o)

So again here's the comparison.

Mine:


And Pottery Barn's

I think it's a keeper;o) And it saved me a whopping $129(not including the purchase of the duvet)!

This Project has been featured here:


Photobucket


kimbo's crafts


UndertheTableandDreaming


Participating in these linky parties:


UndertheTableandDreaming

Visit thecsiproject.com