Monday, November 19, 2012

Dining Room Table-Christmas Centerpiece

Good Monday to you all! The elves have been busy here in our home, and are ready for their naps:o)
It looks like the North Pole exploded in our house...AND I LOVE IT!
I am not ready to share all of our trees...yes there are multiples..possibly 8...so I am waiting until after Thanksgiving to let you guys in on the fun:o)
I know the suspense is killing you;o)
I thought I would share my center piece for the dining room table, just to hold you over.
I created it using items I already had. I love FREE:o)
The September or November(can't remember which) Southern Living magazine had a beautiful centerpiece for fall with pumpkins, fall flowers, and berries. They had an enormous trough that they put it all in, and I thought, I wish I had something like that...well I completely forgot that I did:o)
I got a VERY distressed plant container from one of my mother's friends back in the summer, and stuck it in the attic so the hubs wouldn't fuss at me for junkin' up the garage. Out of sight, out of mind, so I didn't remember having it until I started digging through the attic for Christmas stuff.
I was so very very excited. And even more excited that I had the stuff to fill it up.
Fancy and Free:o)
 It makes a huge statement, because it is huge:o) My favorite part is that it is contained. I don't have a bunch of little nick-knacks strewn across the table like I normally do. Clean, elegant, and bold.
So are you ready for the holidays? Do you have all of your decorations up, or are you patient, and wait until after Thanksgiving to get in the Christmas spirit?
I must be off...I have to go make little man's vest and bow tie for the wedding. Hopefully I will be able to show it off tomorrow. Have a great Monday y'all!

Tuesday, November 13, 2012

Flower Girl Dress

Brrr! It's cold today! I can't believe how easily the cold wind can cut through you. I'm so very thankful for a warm home to shelter me from this frigid weather!
Speaking of being thankful, I have some wonderful news that my family and I are very thankful for. My uncle is getting married! He is engaged to a fabulous woman, who is absolutely perfect for him. We are all overjoyed for the both of them. They are getting married on Thanksgiving Day, and my little ones are part of the wedding party. 
If you are a follower of my Facebook page, you saw the inspiration dress I shared yesterday.
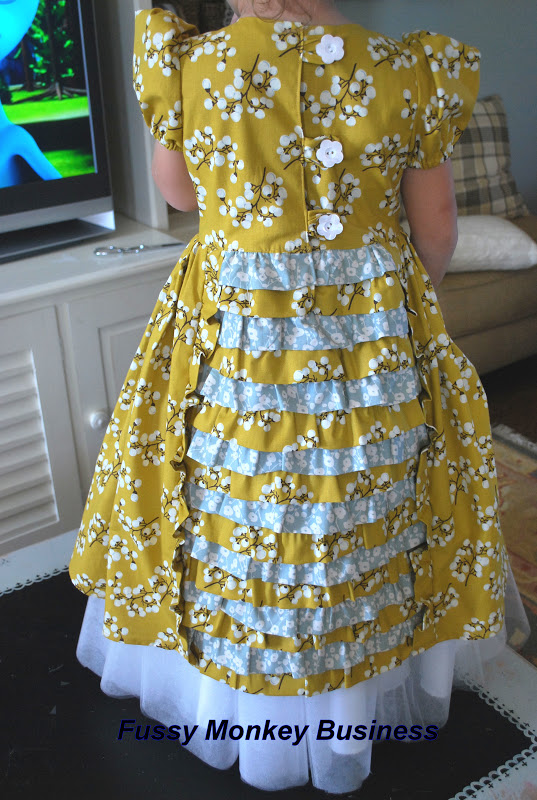
This is my version.
 For seven straight hours, I sewed away. 
Drowning in ruffles, constantly back and forth from my machine to the ironing board.
Blood, sweat, but thankfully no tears:o) (Stinkin' stick pins!)
I accidentally figured out how to make the ruffles quicker by loosening the thread tension...it could have been longer than 7 hours if I hadn't stumbled upon that!
 The neckline was a bear, but I finally got it to work. I pulled the stitches out three different times. 
My favorite is the back. This happened by accident as well. I ran out of the blue fabric, and had to use the mustard colored fabric for extra ruffles. A very happy accident indeed:o)
The petticoat is slightly underwhelming...I meant for the dress to be much "poofier." I think I'll hit Dillard's tomorrow and see if I can't find one to put under this one to give it just a bit more oomf:o)
So did I hit the nail on the head, or did I miss the mark completely?
I love it, and so does S.R....and hopefully the bride will too;o)

Now I must get to work on E's vest and bow tie...something that he is very excited about as well:o)


Updated Photo from Wedding:

Friday, November 9, 2012

Hot Cocoa Recipe

I love cold weather, a.k.a. snuggly weather. I love the warm blankets, cozy fires, and most of all, hot cocoa. 
I am not a big fan of cocoa mixes because of all the added "stuff" that is put in them. I prefer to cook my own.
 I have a favorite recipe for hot cocoa, and I have to share it with you so that you can enjoy it too.
It takes minutes to make, and warms your belly and puts a smile on your face:o)

Hot Cocoa
serves 4
adapted from this recipe
1/3 c unsweetened cocoa
3/4 c white sugar
1/3 c boiling water
3 1/2 c milk
1 tsp vanilla extract

Bring water to a boil in a medium sauce pan. Add cocoa and white sugar. Bring back to a boil, and then lower heat so the mixture simmers. Simmer for 2 minutes. Add milk and vanilla, and warm to desired temperature. 
I usually pour the kids some before it has gotten too hot.
I spy some happy campers right here:o)

Now you can enjoy those few brief moments where they have a smile on their faces, and calling you the best mom ever, after drinking something delicious! Then brace yourself for the sugar high!

Thursday, November 8, 2012

Some New Sewing Projects for Boys

Sewing for a little girl is so easy. There are so many cute inspirations out there for girls, but there really isn't a whole lot to choose from for little boys. Sometimes I feel guilty when I make something for S.R. because for every 3-4 things I make for her, I make 1 for E. Sad, I know.
It's a fine line when sewing for boys because some things out there are border-line ridiculous. You have to take great care in not making your boy look like a girl. 
So anywhoodles, I went to Heart and Home Fabrics on Etsy, and  let E pick out some really cute fabric from the "Children at Play" line by Sara Jane. 
I made this cute little bean bag ottoman from it. If I ever get around to it, I will do a tutorial because S.R. wants one as well:)

 I also made him a cute little vest out of the same fabric. Yes, it coordinates with his ottoman, but how often is he going to be wearing that vest while sitting on the ottoman? ;o)
I'll have a tutorial on how to make a vest very soon because I have to make another one for him. Wanna know why?
Because my uncle is getting married, and E and S.R. will be the ring bearer and flower girl. They are super excited, and so am I. I just have to get busy on making their clothes for the wedding. I have found some pretty awesome inspiration on Etsy, so I can't wait to show you what I'll be working on.
Until next time....

Wednesday, November 7, 2012

Red Ribbon Week Poster-Master Yoda

Since I have been out of school for longer than I am willing to admit, there are a few things that I had forgotten about...one of them being Red Ribbon Week.
I am constantly being reminded of how the world isn't all roses and cupcakes. The thought of teaching my children to stay away from drugs had never crossed my mind until we got a letter from the guidance counselor about Red Ribbon Week. Yikes! How do you explain drugs to a 6 year old who has been completely sheltered? We struggled through it, but I think he got the gist of it. He knows their bad, and God doesn't want us to harm our bodies.
So, since we are all about Star Wars, he wanted to include Master Yoda on his poster.
The hubs knows all when it comes to S.W., so he came up with the slogan.
Pretty catchy, huh?

We flipped through some coloring books, and E picked this image for his poster. I used my little projector, and traced it in pencil.
He traced over the pencil marks in black marker, and then colored it in with crayons.
We used the S.W. fonts to make the letters...just printed the slogan out, cut, and pasted.
Easy Peasy.
He was the only one in his class to do a poster. He got to go to a popcorn party, and there were big kids there...a.k.a. 5th graders, so he felt pretty special:o)
It was so nice to be able to do an art project with him, especially since he's really starting to enjoy drawing...the coloring he could do without:o)
Great mommy/son bonding!

Tuesday, November 6, 2012

Halloween Costumes

Since I have been lagging on posts, I never told you guys what my kids were for Halloween this year. 
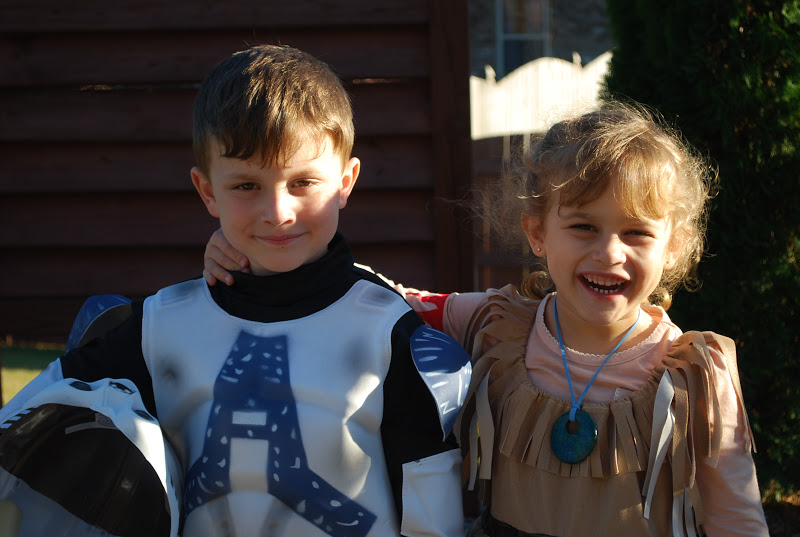
E, once again, wanted to be something related to Star Wars. I'm not sure if he was a clone trooper or a storm trooper, (I get confused) but I most definitely knew that making that costume for him was next to impossible. I hate buying store bought costumes, but I know my limitations people:o)
Thankfully S.R. wanted to be something easy, Pocahontas. The Disney Pocahontas costumes aren't exactly modest, so I decided that we would go for a less flashy, more coverage kind of dress:o)
E didn't get to wear his Star Wars costume to school, but they do have book character day, and get to dress up for that. He chose to be Peter Pan. It doesn't get much easier than that! I purchased 2 t-shirts from Hobby Lobby. The lighter color in his size, and the darker color in an adult large. I turned the adult shirt into pants using a pajamas pant pattern, and used the sleeves of that same shirt to make the hat.
 His belt was made out of brown ribbon and Velcro, and his feather was made from felt. He loved it, and best of all if was cheap and super comfy for him.
 S.R. 's costume took some planning, but once I figured out how I wanted to construct it, it was smooth sailing from there. I used a peasant dress pattern found at Walmart in the 99 cent section. The fabric is some kind of faux leather/suede material, also purchased from Walmart.
After I pieced the dress together, I cut the skirt portion into a V, and then laid it flat on the ground and started cutting slits. 
 I bought a shirt and leggings and dyed them tan, and painted a red tattoo on the sleeve of the shirt. 
The whole reason S.R. wanted to be Pocahontas was because of her "blue diamond necklace." The girl likes her bling, so I definitely had to include the neckalce!
I found the medallion at Walmart in the discount jewelry making section, and looped a leather necklace I had on hand through it.
That's one pretty little Indian Princess:o)
 Here is a shot of little man in his "Whichever" Trooper costume:o) Such a sweet boy!
 And the with the helmet on for the full effect.
We didn't do the normal neighborhood trick-or-treating this year for two reasons...the first was because it was on a Wednesday night, and we had church..and the second was because we have been fighting a cold virus, and S.R. has been on a nebulizer for quite some time now. We needed to stay out of the cold air, so  we decided to trick or treat at a local retirement home, and visit with the ladies there. 
It was so fun, and I'm so glad we got to visit with those sweet women!

Monday, November 5, 2012

Canned Applesauce Tutorial

Well hello there! Been a while hasn't it? Life around here has been crazy busy for the past month or so, and it doesn't seem to be slowing down any..especially with the Holidays approaching...I'm not ready fro Christmas to be here!!
With E being in big school now, I feel like the weeks are flashing before my eyes. I keep forgetting that he is 6 years old now. I need for life to tap the brakes just a little:o)
So since things have been a little cray cray around here, I haven't had the chance to blog. I have been taking plenty of pictures, and have plenty to blog about. I just haven't had the time to just sit, and type.
I have a few minutes to myself, so I am taking advantage of that time:o)
Today I wanted to share how to make canned applesauce. 
A friend of mine is part of a food co-op, and she always asks if I want to order bulk items. Um, yes please:o)
 These apples were super delish and super cheap! But there was no way we could eat a bushel of apples, so  I put a few to the side, and turned the rest into applesauce.
This is super easy, and anyone can do this...I promise!
I searched online for different techniques, and the one I found most to my liking was the one from pickyourown.org. Definitely check out this website for full details.
 I had to make a few changes because I didn't have the same materials that they did, but I made do with what I had.
I started with a half bushel of apples. I have no idea what these apples are called:o) (If you check the blog above, they give several different types of apples that you can use.)
I didn't have a grinder attachment on my Kitchenaid mixer, so I peeled the apples, and then I used an apple corer doo-dad.
And this is what I ended up with.
 I added an inch of water (which was too much) into the bottom of a 12 qt. stock pot. I got mine from Walmart for $8.95
Once the apples were soft from cooking, I placed small batches into my food processor and pureed them, making sure to use a slotted spoon.  You could probably do this in your blender as well.
 I poured each batch into a large bowl, and covered to trap the heat.
 Once all of the apples had been pureed, I added 2 cups of white sugar to the batch. Adding the sugar is definitely optional.
 I did a mix-match of pint and quart sized jars. The website I referred to suggested that you cook the pints for 15 minutes in the canner, and 20 minutes for the quarts...I just did 20 minutes for the whole batch, to save myself the trouble.
 After the 20 minutes, they were ready to come out of their bath and cool. The tops popped almost immediately after coming out of the canner. That "pop" was definitely music to my ears because it meant I did it right:o)
I placed the jars on a towel to cool, and loosed the lids so that they wouldn't rust shut. 
Start to finish, it took 2 hours to make applesauce. If you had the proper kitchen tools, you would most definitely get done sooner:o)  
I was so excited when I got done! I felt all kinds of domestic:o)
If you have any questions about any of the steps, I will do my very best to answer them. Your best bet though, would be to click on the link from above:o)
Happy Monday!