Monday, December 3, 2012

D.S.C.C.W.-Snowman Ornament

Hey Everybody! I am so excited to get this week started with the Christmas crafts the kids and I have been working on. I hope you enjoy them as much as we do. 
I tried to come up with different crafts by using items that either came from the Dollar Tree or were $1 or less.
Today we'll start with a Snowman ornament.
Here's what you'll need to get started:

-Wooden Round disk..found ours at the Hob for 67 cents, I believe, in the clock making section. 
-Craft paint-White, Orange, and Black(already had on hand)
-2 Spools of Ribbon (1 for "scarf" and 1 for hanging the ornament)
-Glue Gun and Glue sticks
-Scissors
-Craft Foam, red & black(had on hand as well)
-Craft glue
-Paint brush

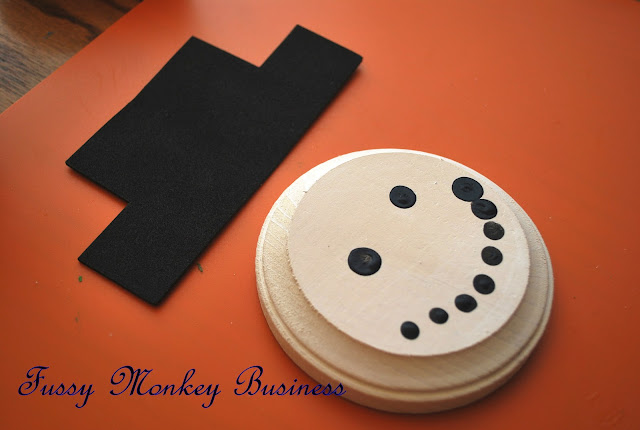
 You will need to paint the wooden disk first with the white craft paint. Then mark out with a pencil where the eyes and smile go.
 Let your little ones use their fingers to put a black dot on each spot you marked with a pencil.
 Just small little dots
 It should look something like this:o)
Next you want to cut out a hat from the black craft foam. I folded the foam in half lengthwise, sketched out a hat, and then cut it. Just trimmed a little here and there to make it look even. You'll also want to cut out some red for the "ribbon" above the brim of the hat(see pics below), and attach it to the hat. You'll want to do this BEFORE you put the hat on the ornament. I did that part backwards and had to remove the hat while the glue was still wet.
 Squirt a little glue on the top of the Snowman head, and attach the hat.
 It should look like this when you're done. 
I painted a little carrot nose on his face. You can let your kids do this, but mine are still a little young to wield a paint brush:o)
 Next is the scarf. I used ribbon I already had. I tied a knot, and trimmed the ends on an angle. I attached it using my hot glue gun at the Snowman's chin.
 Once everything is dry, you can flip it over and attach ribbon to the back so that it can be hung.
This is what our Snowmen looked like when they were finished...so cute!

Make sure to come back tomorrow!! I'll be sharing Christmas Angels using some very interesting materials:o)

Participating here:
UndertheTableandDreaming

Thursday, November 29, 2012

Holiday Wreath-My Front Door

Just a short post today. 
I finally dove head first into a mesh ribbon wreath. It seems like they have been around for ages now, but I am always a little slow on hot trends...I have to make sure they're going to stick around before I jump on the bandwagon:o)
I am really excited about this wreath, and I loved how easy it was to put together. My "W" looks right at home in the middle:o)
I hope you all are having a great Thursday! I'll see you soon!
Remember to come back and check out the Dollar Store Christmas Crafts next week!!

Participating in:
the CSI's Christmas Wreath Challenge

Wednesday, November 28, 2012

My Home for the Holidays-Part 1

Finally...
I am finally sharing my Christmas decor with you all...about time, isn't it?
Today you get to see my living room.
There are 6 other rooms to see, so I decided to spread them out in different posts. 
Things are much the same as last year, but for those of you who are new here, it will be your first time to see it.
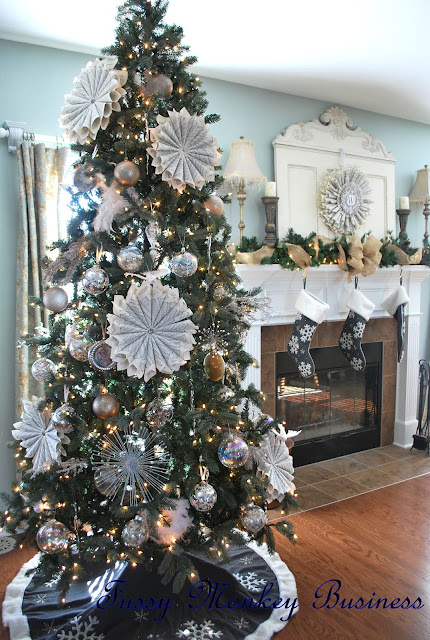
 We have 9 foot ceilings, so I get to have a gi-normous tree:o) Our tree was a craigslist purchase about 2 years ago, and I am so glad that I found it. 
Filling it up has been a task, but thankfully, my mother purchased most of the ornaments:o) She bought them for herself, but they didn't work with her decor, so I gladly took them off of her hands!!
The wreaths on the tree were made from the hubs' grandfather's old hymnals...so they're extra special:o)
 The Hob was out of the ribbon I have on the mantle, so I had to settle for this really cool ribbon. It was in the ribbon section, where as the other was in the floral section. It took two rolls to fill the length of my entertainment center.
 Here are some pillows I made the other day. 
They were place mats in their former existence. I purchased them at Kohl's when they had all of their holiday wares 80% off. I am not usually a big fan of deer decor...tends to put off a tad bit of the red-neck vibe here in the South...nothing against red-necks..I'm just not one:o)
I felt like these were Christmas-y enough, though:o)
 We currently have a new guest in our home. I would like for you all to meet Snarf.
 Yep, that's what the kids named him. It took some convincing, but I think they are both on board....the 4 year old more so than the 6 year old. It's been fun to get them to hunt for Snarf in the mornings. 
S.R. lights up when she sees him every morning. We have the Elf on the Shelf movie coming in the mail, so it'll be fun to see their reaction to that.
We are having TONS of fun with our Christmas crafts this week. I am really excited about showing them off next week during the Dollar Store Christmas Craft Week.
I have lots more trees to share, so stay tuned!

Tuesday, November 27, 2012

Christmas Mantle

I wish I had pictures of my trees, but I don't...by the time I got around to taking them, the lighting was bad. Today is an overcast, dreary day, which is terrible for taking indoor pictures. So, my dear friends, you will have to wait a little longer..sorry!
I did get some pictures of my mantle, though.
This is the after:
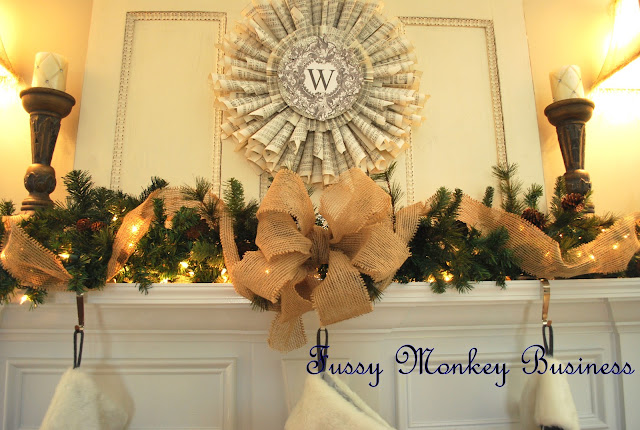
This was the before...sad, skinny little garland. I know it's hard to believe, but that is two strands of garland wrapped around one another. Those things are so skimpy. I was bored to tears with my mantle. Just plain ole bored. I have always wanted to have live garland, but after checking online, I realized that it is truly more trouble than it's worth. So off to the Hob I went.
I purchased 6 pine cone picks. They are always 50% off, so they were $2 each. I also picked up some really pretty burlap ribbon...
(I am going back for more today so that I can wrap the garland on my entertainment center. It looks out of place since the one on the fireplace is so fancy now:o)
I fluffed the picks, and spread them out over the mantle. I made a huge bow out of the burlap ribbon, and attached it with floral wire. Then I took the remainder of the ribbon and ran it up down and around the garland.
 No more boring mantle. By adding just a few picks and some ribbon, I completely transformed my puny little garland:o)
 Love:o)

Next week I will be sharing a different craft each day where all items to make the craft are either from the Dollar Store or they are $1 or less. I'm so excited! The kids are having so much fun with this!! I hope you'll join us. At the end of the week, I'll host a Linky Party so that you all can share what you have been working on for the Holidays as well.

Monday, November 26, 2012

Our First Christmas Craft of the Season

I hope you all had a great Thanksgiving! We surely did!!
We got back home on Friday, so there was plenty of time to get settled and relax a bit before starting the work/school week.
The holiday baking has begun, so I have to make sure I keep my running shoes broken in, or I'll be asking Santa for the next dress size up;o)
 Our first Christmas craft was peppermint Christmas trees.
 Thing 1 & 2 worked very hard at unwrapping many many peppermint discs...most made it on the trees...a few ended up in their bellies:o)
We started with tacky glue, but that was a bust..wet glue and sugary candy aren't a good mix..so we had to pull out the hot glue gun.
 I did all of the gluing, but this was a craft that required all hands on deck, so they didn't get bored with me doing the work. We had a lot of fun crafting, snacking, and listening to Christmas music.
Oh yeah, there was a wedding over Thanksgiving holiday:o)
Here are a few shots of the kids in their outfits I made.

 I am so blessed.


We went a head and started Elf on the Shelf...it's been hysterical!
We might have waited a little too late to start it..6 year olds are a little harder to convince of such things, but it's been absolutely too much fun trying:o)
I plan on taking pictures of our trees today. Hopefully I will get them posted tomorrow!!!

Wednesday, November 21, 2012

Boy's Vest and Bow Tie

A day late, I know, but here is E's vest and bow tie. 
I used a pattern for the vest, which was very confusing by the way. That's one of the reasons I like making my own patterns. I can piece the puzzle together quicker than I can read instructions and try to make sense of what they're trying to tell me:o)
Anyway, I am glad to have it done!
 The bow tie took about 35 minutes to make from start to finish. I think I will be making more of these. It's so stinkin' cute! The hubs even said he wanted some bow ties:o)
 Tomorrow is the big day. The kids are pumped, and the hubs and I are reeeally nervous:o) Not about the kids being the flower girl and ring bearer...they'll be fine...the hubs is playing the music and I am taking the wedding pics...no pressure..no pressure at all..ahhh!
I hope you all have wonderful Thanksgiving. Make sure to treasure every moment with your family, (no matter how annoying you might think they are, for those of you dreading it). You never know how long you'll have them!!!
Hugs to all!

Monday, November 19, 2012

Dining Room Table-Christmas Centerpiece

Good Monday to you all! The elves have been busy here in our home, and are ready for their naps:o)
It looks like the North Pole exploded in our house...AND I LOVE IT!
I am not ready to share all of our trees...yes there are multiples..possibly 8...so I am waiting until after Thanksgiving to let you guys in on the fun:o)
I know the suspense is killing you;o)
I thought I would share my center piece for the dining room table, just to hold you over.
I created it using items I already had. I love FREE:o)
The September or November(can't remember which) Southern Living magazine had a beautiful centerpiece for fall with pumpkins, fall flowers, and berries. They had an enormous trough that they put it all in, and I thought, I wish I had something like that...well I completely forgot that I did:o)
I got a VERY distressed plant container from one of my mother's friends back in the summer, and stuck it in the attic so the hubs wouldn't fuss at me for junkin' up the garage. Out of sight, out of mind, so I didn't remember having it until I started digging through the attic for Christmas stuff.
I was so very very excited. And even more excited that I had the stuff to fill it up.
Fancy and Free:o)
 It makes a huge statement, because it is huge:o) My favorite part is that it is contained. I don't have a bunch of little nick-knacks strewn across the table like I normally do. Clean, elegant, and bold.
So are you ready for the holidays? Do you have all of your decorations up, or are you patient, and wait until after Thanksgiving to get in the Christmas spirit?
I must be off...I have to go make little man's vest and bow tie for the wedding. Hopefully I will be able to show it off tomorrow. Have a great Monday y'all!