Thursday, September 13, 2012

Slap Yo Momma Biscuits

 My best friend from high school gave me a recipe for biscuits when I got married. I never used it because I already had a biscuit recipe. I thought mine was the best in the world, and proudly looked down my nose at other biscuits, and their inferior ingredients.
Well I ran out of my usual "superior" ingredients, and decided that I would try this "inferior" biscuit recipe. This poor recipe had sat un-used for almost 10 years in my recipe book.
It called for 2 ingredients. 
I scoffed. 
I mixed, rolled out, cut and baked, thinking to myself, "I hope these will do."
I humbly ask forgiveness from my dear friend and her ROCKIN' biscuits. They were not inferior at all! Not only were they extremely light and fluffy but they were 'slap yo momma' good!
So are you ready to try these for yourself?
Here's what you need and what to do:

1 pint of whipping cream
3 cups of self rising flour

Preheat oven to 400 degrees. 
Mix ingredients by hand. Roll out on floured surface. Cut with biscuit cutter and bake.

I told you it was easy...now go make you some biscuits, and don't wait 10 years before making them like I did;o)

Wednesday, September 12, 2012

Little Red Riding Hood Dress

A few weeks ago, I got the Kelly's Kids catalog in the mail. I love looking at all of their beautiful clothing. It's especially fun to get some inspiration from there.
I found the cutest little Red Riding Hood Dress, and reeeally wanted to make it. I didn't have the corduroy fabric, but I did have something similar in shade.

 After I made the dress, I asked my friend who has her own monogramming biz, called Sisterbug, to find a little red riding hood applique.
She can always find what I need!
Isn't Red the sweetest looking thing?
 This is one of the first dresses that S.R. was excited about in a long time. I can't wait to put her in it!!

Tuesday, September 11, 2012

Gearing Up for all kinds of fun!

I have missed you all...have you missed me?;o) Last week I was M.I.A. because the hubs was working from home...which means he had the one and only computer in the house. 
So I haven't been able to fill you in on what I have been up to. I have lots to share, but I'll share a little at a time, so that your brain doesn't explode:o)
Anyway, I'm sure you all have noticed that football season is in full swing. I have always wanted to do a kick off party, but never got around to doing it until this season.
 The hubs is a big University of Alabama fan. 
So we invited some of our close buds(also BAMA fans) over for a taco bar, and had fun watching the game while the kiddos played the night away.
Below was the set up for the table. I kept the snacky foods in the living room for quick access, and the rest of the dinner food was in the kitchen.
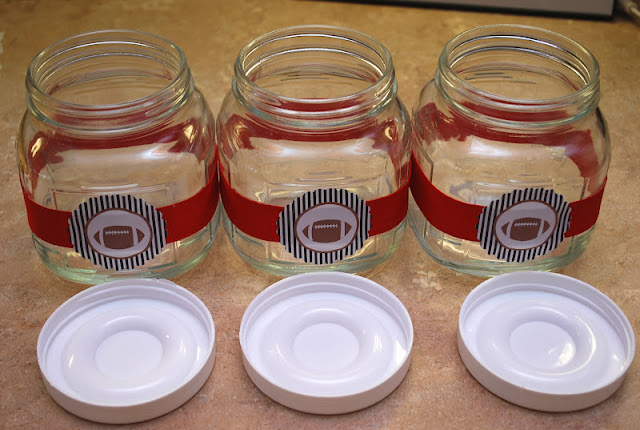
I made this yummy....let me re-phrase...oh, so delicious caramel corn for my guests to take home with them.
 I filled these glass jars(dollar tree) with the caramel corn. I added the ribbon and the little football cutouts.
 You can find the recipe and the cutouts over at The Party Press. You really need to make this stuff...for reals.
 Here's a shot of all the babies...they were so good!! They played so well, and laughed the whole night. It was GREAT!!
I can't wait to do it again!
September seems to be the month of parties...I'll give you one guess as to what is coming up next...and for those of you who have been following me for a while know that I love throwing kids parties. I can't wait to start sharing some of the details for E's 6th birthday party.


Friday, August 31, 2012

$4 Console Table

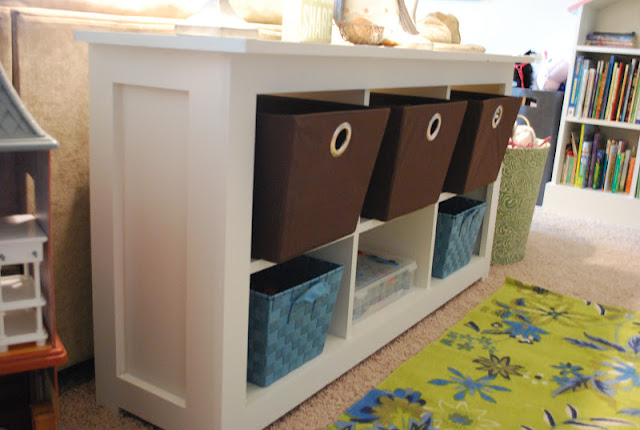
I told you a few weeks back that the hubs was working on some built-ins...well, he has been doing a great job on them!  Since he was in the building mood, he decided to make a console table with all the scrap MDF he had laying around to hold extra toys. We found our inspiration Here..there were plans, but we didn't have enough MDF to make the exact same table, so there was some improv building. The reason it's a $4 table is because I had to make a quick trip to Lowes to get one 1x3 board. 
I helped a little(held things in place, painted, moral support), but he was definitely the brains behind the job:o) I'm so proud of my little handy man:o)
The canvas baskets came from T.J. Maxx. 
The rug is from Marshalls.
I found this cute little owl and the sign at Marshall's too.
 Lamps and lamp shades(clearance find) from Walmart.
 And here are the beginnings of the built-ins. We recycled our entertainment center, and attached it to the wall. Then the hubs made the window seats. He finished it out with trim across the bottom. Eventually there will be more added on, and the whole thing painted white, but right now he needs to focus on his thesis.
 Hasn't he done a fantastic job?!? 
 I hope that you all have a wonderful holiday weekend. We have ours filled with food, football, friends and family...it doesn't get much better than that!

Participating here:


Furniture Feature Fridays


Monday, August 27, 2012

Fall Dinner-Chicken Spaetzle & Homemade Bread

I can't stand it any longer...Fall needs to just get here and stay here:o)
It has been a scorcher for the past few days after we were taunted with cooler weather. I am stubborn by nature, and have made soup and homemade bread, regardless of this horrid heat, hoping this will show Summer that I have had enough of it, and am ready for it to go away:o)
 Chicken Spaetzle is one of my favorite soups in the whole wide world. I order it from Bruegger's every time I visit that restaurant...which is a lot:o)
I looked for their recipe, and couldn't find anything but the calorie count online...I DON"T CARE what the calorie count is...IT"S DELICIOUS!
So anywho, I found a few recipes online and kind of tweaked here and there, and this is my version of Chicken Spaetzle.
recipe adapted from HERE
  • 2 chicken breasts (about 1 lb total)
  • 2 cups water
  • 4 cups chicken broth 
  • 1 1/2 tablespoons butter
  • 1 large onions, chopped
  • 1/2 cup chopped celery
  • 1 cup diced carrots
  • 2 garlic cloves, finely minced
  • 2 teaspoons salt 
  • 1/2 teaspoon pepper
  • 1/2 teaspoon poultry seasoning1 package of potato Gnocchi

    Combine all ingredients, except the gnocchi, and cook on low for 2 hours. After the 2 hours, shred chicken in the soup, and add gnocchi. Cook gnocchi in the soup according to package directions(just don't drain;o). Serve with homemade bread.


    I found this homemade bread recipe to go along with our soup.
    Food Processor White Bread
    from breadworld via Jennifer Judd-McGee
    makes 1 loaf
    3 cups all-purpose flour
    2 Tbl. sugar
    1 envelope RapidRise Yeast (do not use any other kind - just RapidRise)
    1 1/4 tsp. salt
    3 Tbl. butter
    1 egg
    3/4 cup warm water
    Insert metal blade into food processor. Add flour, sugar, undissolved yeast and salt; process 5-10 seconds. Add butter and egg.  Begin processing, then slowly pour warm water through feed tube just until dough forms a ball, about 10-15 seconds.  Continue processing for 60 seconds to knead dough (I let it go longer, more like 2-3 minutes, just for good measure).  Remove dough onto a lightly flour surface. Cover and let rest for 10 min.
    Roll dough into a 12 x 7-inch rectangle. Beginning at short end, roll up tightly as for jelly roll.  Pinch ends and seam to seal.  Place, seam side down, in greased 8 1/2 x 4 1/2-inch loaf pan.  Cover; let rise in warm, draft-free place until double in size about 30-45 minutes (I've let it go much longer than this and it is just fine).
    I usually brush it with egg wash or a bit of cream to give the top a nice shine, but you don't have to.  Bake at 375 degrees for 30 minutes or until done (30 minutes is always just perfect for me).  Remove from pan and let cool on a wire rack (be sure to remove it because otherwise the bottom will get soggy while it cools).  Slice and enjoy!

    This was a wonderful dinner, and I am so glad that we have air conditioning because when you eat soup, it warms your insides...who wants to be hot on the inside and outside;o)
    The kids loved the soup, so we have a winner in this household...when we actually get cooler weather, this recipe will definitely be a regular on the menu;o)

Friday, August 24, 2012

Family Night Recipe


So last night, life got in the way. The hubs needed to get the lawn mowed, dinner was made late, phone calls and emails needed to be taken care of, and S.R. ended up with a fever just before dinner.
Our family night didn't happen...that's just the way things go sometimes. 
But, even though all of this was going on, we still got to take just a moment together and indulge in homemade Peanut Butter Cups....one word....yuuuuum!
I found the recipe in the current All You magazine(September edition)
If you want to take a swing at these little delectables,  you can find the recipe 
WARNING:You will not be able to eat just one!!!!
Have a great weekend y'all!


Thursday, August 23, 2012

Allowance/Money Holders

Ok, so I said I would post about these on Monday...well Monday has turned into Thursday for sure...but I am finally getting around to sharing with you our newest endeavor....allowances...enter shiver/shudder.
We now have to make our children be responsible little helpers...which makes us have to be more responsible because we have to remember to remind them to do their chores....and on top of that, we have to remember to keep $6 in 1's on hand, so that we can make sure they get their $3 a week.
Sheesh!
Who knew it was going to be this involved:o) 
I kid, I kid:o)
E and S.R. have been great about getting their chores done for the past two weeks, and we are so grateful. Not only are they learning valuable lessons in doing a job and doing it well, they are lightening the load on their poor pitiful mother;o)
So here are said money/allowance holders.
All items used to make these money holders were purchased from Hobby Lobby except the buckets. I found the buckets in the dollar section at Target.
 I've seen and heard, for the past few months, of parents using three categories...Share(or give), Save and Spend. I think that teaching the kids to divide their money up now is an awesome life lesson. The earlier they learn to save their money and to give of their means, the better off they will be when they are adults. 
Last Sunday they were actually able to give their own money to the collection plate at church. I didn't get to see it because I wasn't feeling well and stayed home, but I know that before they left for services that morning, they were really excited about giving their dollar.
It's the little things, right?
So what do you think? Are you inspired to make little helpers out of your rugrats? I promise it is well worth the effort!
 Here is a list of items if you want to make your own.
1 plywood board
3 oval shape wooden discs(optional)
scrapbook paper
letter stickers
Mod Podge
Paint for the plywood board(optional)
Drill(for holes)
Ribbon(to hang)
3 buckets with handle
3 mini cup hooks 
Wood Glue
I hope that all of you who started school this week have had a fantastic first week back. I know we sure have. I am still adjusting to getting up early....too bad I can't drink coffee...boo!
Family night tonight...I'll post recipes tomorrow...maybe;o)