Pages

Friday, February 26, 2010

Giveaway Time!!!

I know that you have all been waiting for this giveaway, so here it is....
 
A $25 GIFT CARD TO HOBBY LOBBY!!!
I know that you all are super pumped. So here's whatcha do...
1. You have to be a follower of Fussy Monkey Business
2. You have to leave a comment. 
3. The comment has to refer to this acronym.....F.M.B.G.G.
**be creative, make something up, but keep it clean:o) 
The winner will be announced on Wednesday March 3rd. You can enter twice.
GOOD LUCK!!!!!!!
This giveaway is closed.

Feature Friday


FEATURE FRIDAY IS HERE!
 
 
Thanks to Alainna for sending me these cute boxes. She is expecting her first lil bambino and made these sa-weet storage boxes. She got her idea here. I am definitely making some of these for my craft room/closet....yes my craft room is a walk in closet with NO windows...however, I am thankful to have a place to be able to shut the door and leave the mess behind;o)

Thursday, February 25, 2010

Vinyl Table Cloth Runners

 
Here's a little color inspiration....Don't these colors just scream SPRING! They also scream "S.R.'s BIRTHDAY PARTY IS NEXT SATURDAY!!!! I can't wait for her party. There are so many cutesy things out there for little girls and their special days. As I said in a previous post, we are doing a butterfly theme for her party. I have been buying little by little over the past two months, and I have found some really cute stuff. I have been trying to figure out what I was going to do as far as table-scapes(yes, it's one of those kind of parties, and yes I am one of those mothers:oP) I was at Ross the other day perusing their Easter stuff and ran across this vinyl table cloth for $4.99

 
Personally, I really didn't want to go the vinyl route only b/c I like a little "fancy" in my parties, but then I came to my senses and realized that there are going to be 2 & 3 year olds running around like little precious "crazies" in my house. OF COURSE vinyl is a good idea! I am doing things on the cheap, so I wasn't going to buy 5 table cloths...so I thought, why not table runners? A friend of mine is donating some tables of hers that are just the right height for the little rug-rats, so there wasn't any need for a full size table cloth. Especially when little ones jerk those sorts of things right off a table:o) So anyway, I was able to get 5 runners out of one table cloth:o) Here's how I did it....
 
 
I spread the table cloth out on the floor. 

 
There are rounded edges, and I new I didn't have the patience to round each corner, so....
  
I cut them off:o)

 
I cut them to the length I needed for each individual table, but they are all 13" wide(except for one and it's 12" wide). I then took them to my sewing machine and sewed a zig zag stitch around the perimeter.

 
I didn't get right on the edge just b/c this is plastic and I didn't want the edges splitting from one another. Just enough to hold the cotton backing to the vinyl.

 
And there ya have it. Pretty simple, and very inexpensive. The decorations that are on the table runner are some things that we will be decorating with. The butterfly stands came from the Dollar Tree. 
 
The centerpiece I made using flowers & a butterfly from Hobby Lobby(which are 50% off right now), and some floral Styrofoam from Dollar tree. I already owned the clay pots. Just brought them in, and gave them a good washin'. I hope that I have brought a little spring in your day:o)

********************************************************
I HAVE BEEN FEATURED ON U CREATE!!! They are featuring New Craft Blogs every couple of days, and I am SUPER pumped about having Fussy Monkey Buisness on such a popular blog...THANK YOU U CREATE!!!

*******************************************************
Tomorrow is the big announcement for my next giveaway...stay tuned!!!!!
 

Wednesday, February 24, 2010

Re-upholstered Chair

Many of you have seen this chair, but I thought that I would share the story behind it. I am in L-O-V-E with garage sales. I love the thrill of the hunt. Finding a treasure for next to nothing sends me over the top:o) This chair was one of those finds. When I found this chair, we were in the process of deciding whether to build a new house or add on to our existing home. So of course I had to start looking for more furniture...even though we had no idea what we were doing yet;o) Anyway, it was a beautiful Saturday morning, I am out dying to find something and there it was...the chair. I walked past it once, then again, saw the price and said to myself, "Ain't happenin'", then walked past one more time and then asked the seller, "will you take $25 for it?" And of course you know they did b/c now I own the sucka:o) They helped me load it in my van(yes, I own a van and you would too if you knew what was best for you...I haul EVERYTHING in that bad boy)
Well we decided to build a new house, so the chair went to storage for 4 months. When we moved into our dream home, we definitely needed some furniture. This house is a tad bigger than our last house. I couldn't wait to have the chair in the living room. The only problem was, I needed to recover it, as you can see below.
 
The fabric was dingy and worn in some places. I found some great upholstery fabric at Hancock Fabrics for $6 a yard. It took 8 hours to take this chair apart. I couldn't believe how many staples were in this thing!!! It only took 3 hours to put it back together...thank goodness:o) It was a lot easier to do than I thought. I love that the hubs has a pneumatic(I think that's what he calls it??) nail gun. That is my new favorite toy:o) Here's the finished chair:


************************************************
Remember to email in some pictures of projects that you have completed so that I can post them on Feature Friday's. Also, I will be posting a GREAT GIVE AWAY on Friday for followers only...Stay Tuned!!

Monday, February 22, 2010

Boy's Beach Themed Room

I know that I have been all about some girly stuff here lately, but I do remember that I have a little boy. For all you mom's who need a little inspiration in all things boy, here ya go...This was my son's room in our last house, Over-The-Top Beach Theme...I haven't started on his room in the new house yet, but the wheels have definitely been turning. As soon as S.R.'s birthday party is over, E. is gonna get some love;o) Here are a few pics of his old room..when his mother actually paid him some mind...
 
The mural was painted by a lady that attended church with us...isn't she "Tha Bomb"??? My mother actually visited a model home and they had this same mural displayed in one of the children's bedrooms. "Tha Bomb" was able to use the picture that my mother gave me and copy it backwards to make the Woody face the right direction in E's room. I'm tellin' ya, she's awesome!
  
I painted the wave, and I'm not nearly as talented as my friend who painted the Woody, but it served it's purpose.  The quilt at the end of the bed, I made. It is a knock-off of a PBK quilt. I went to the nearest thrift store and bought a bunch of Hawaiian themed shirts. I cut them all up and pieced them together.
  
The grass skirt window treatment was actually a bedskirt for a twin bed that I cut up and hot glued to a wooden frame that the hubs constructed. 
 
The art work on the wall came from the internet. Just printed them off and put them is some frames that we already owned. This room was actually THE selling point for our house. The couple who purchased our home had been married in Hawaii...how cool is that:o) I hope that you have found some inspiration!
********************************************
Participating in:

Visit thecsiproject.com

Small Buffet Redo

 
All I have to say is THANK YOU Krylon Cherry Red! I truly had forgotten how much fun it was to spray paint furniture. Back in the day, that was my method of choice...how could I forget how much fun it was?!?! Anyway, my inspiration came from All Things Thrifty, a blog on how to re-purpose shabby furniture and make it fabulous. Thanks to Brooke for pointing me in the right direction!! 
I had a serious color issue (or should I say the lack there of?) in a corner of my living room. Too many wood tones...wooden chairs, wooden buffet, wooden floors, and wood toned accessories...So Very Blah! It has been driving me CRAZY for weeks, but I didn't know what to do until I saw the hutch on A.T.T. Here's the before...

 
A close up

 
Even closer..YIKES! Can you tell how old this thing is:o)
  My mother gave me this piece a few years ago. She was going to trash it just because the thing is falling apart(as you can very well see). I saved it from being disposed of, and didn't do a thing to it because I always dreamed of taking it to the Antiques Roadshow and them offering me a million bucks for it. After many years of watching that show, I finally realized that they would probably laugh in my face and tell me that I should have let my mother throw it in the first dumpster she came to:o) 
I am so glad that I became brave enough to paint this. It looks so much better!

 
You can see the details so much better now that it's in a brighter color

 
She needed a little BLANG-BLANG, so I busted out the Gold paint

 
I always feel good about a project when I get an, "Oh, Wow!" from the hubs, and there isn't a bit of sarcasm in his voice..haha! There are still some accessorization issues. But these will do for now...


Be on the look out for an upcoming give-away. More details to follow soon!


Friday, February 19, 2010

Pencil Art


Our anniversary was at the beginning of this month, so a gift was in order. The hubs is a HUGE 'Bama fan. He has his own office in our new home, and has started with the Alabama theme. (It isn't tacky...yet;o)) He has one of those stained glass lamps with a Bama emblem on it(which was very expensive, thank you in-store credit). I plan on buying some hounds tooth fabric and making him some curtains. Anywho, I really wanted to get him an Alabama print for our anniversary.... have you seen how much those puppies cost? Outrageous! So anyway, I thought that I would try to draw something for him, since I used to be a fairly good artist. I have always been able to copy cartoon art, but had never been able to draw living objects. I couldn't ever get the shading right..
I decided I would try to draw an elephant. I wanted the ears to be flared, so I hopped on the internet and typed in Elephant. The first elephant I came to had his ears flared, so boom there ya go, off to the printer Mr. Elephant...our printer was out of yellow ink, so the printer informed me that we can only print in black...that was the best thing that could have happened. Since the picture was in black and white, I was able to pick up all the high lights and low lights. In about 2 hours I had the picture drawn, and was SO EXCITED about it. My little precious monkeys kept jabbing at it with their little paws and moma was about to go ape on 'em. I had to hide it for a few days until I could figure out what I was going to do about a frame. Square frames are a lot more expensive, and I am too cheap to have it framed. One night, while laying in bed, I remembered that I had a print that I wasn't going to use since it no longer matched my decor. And guess what, it was in a square frame..SCORE! I had to physically rip that sucker out b/c someone got a little glue crazy at the picture factory. After all of that, I was able to get the elephant in his final resting place. When anniversary time came, I couldn't wait and gave it to the hubs before he headed into work. He was so impressed that he had to hang it immediately:o)

Thursday, February 18, 2010

Tutu Skirt

Everyone is making these tutu skirts, and they are absolutely too cute. I LOVE the pettiskirts, and have seen several different tutorials for them, but I know myself too well, and I would be ready to throw my machine out the window if I attempted one. So I decided that the tutu skirt would do just fine. I found a video tute on You Tube. These are super simple to make. I made this one while the kids were napping yesterday.  S.R. will be wearing hers for her birthday. I plan on appliqueing a t-shirt I found at Target the other day for $1.50 to match the skirt. I also got her some cute leggings. She isn't really pumped about wearing the tutu, probably b/c it's so stinking bulky, but she looks like a doll in it....so she's wearing it:o) I think I will let her play in it a few times before the party so that she will be used to it. Tell me what ya think...have you guys tried to make one yet? I would love to see your pics. I am thinking about adding some embellishments. I am dying to try to make one of those gi-normous flowers as a hair bow to match it. Any advice?

Wednesday, February 17, 2010

Super Cape...for S.R.

About a year ago, I made E a Super Man cape. He wouldn't touch it. He didn't like anything on his back or neck...we're just now getting him to wear clothes at home:o) (I say that, and I just saw both of my children run upstairs in their skivvies) Anyway, when little sister started showing some interest in the cape, he began to wear it. You know that little thing called sharing? Well it happens on rare occasions in  this house, so S.R. needed her own cape. All the fabric that I used was on hand. Like the left over fabric from her curtains(yeah, I know, it seems like I have used that fabric in SOOOO MANY projects..I'm trying to get rid of it!) I used another coordinating fabric as well. I used E's cape as the pattern b/c somewhere along the way I lost the other pattern I made. I cut out the emblem using the white fabric, and I embroidered her name on it. That was almost a pain....my machine only embroiders in a 4x4 square and I wanted her name big. Let's just say that I ALMOST have the lining up of letters mastered. Anyway, after appliqueing the Super Man emblem onto the top fabric, I joined the front and back together, leaving the shoulders open, flipped and sewed on some quilt binding with a little velcro on the ends to make it easy to get on and off. She was in love with it. She has been showing it off to E which makes him want to go grab his...I have two little super heroes running around in true super hero form...in their undies;o)

Tuesday, February 16, 2010

Easy Pillow Sham Tutorial

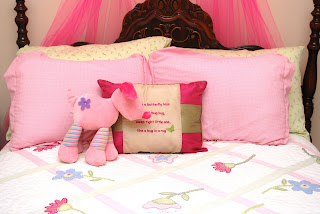
A few weeks back I made an extremely lame attempt to make shams for S.R.'s bed. I had some left over fabric from her curtains, and thought I new what I was doing. I was gettin' all crafty thinking I was going to put a ruffle on it...it turned out terrible. So for that amount of time, I have been trying to tuck and disguise my terrible sewing job...
 
I had some white fabric lying around, and thought...why not give the shams a try...again...now that I have had ample time to figure out how to really make them. I had some pillows stuffed in a closet that weren't fluffy anymore, so I figured I would just cut open a few and use those to stuff the shams.
 
I wanted to put her initials on them so that they wouldn't be just plain Jane shams...no offense to any of you Jane's out there;o) Anyway, I went to the computer, found a font that I liked (Elephant), blew it up to like 400 or so. I made the W slightly bigger. I ran out of fusible stabilizer, so I had to use what was on hand. The thick stuff that doesn't stick...oh well. I had to be extra careful. I used some more of the pink and white gingham and cut out the initials...just a reminder...if you have 2 pillows, you need to do this twice;o) I always forget to double up;oP....

Next pin the letters on the white fabric...making sure to keep them somewhat centered.  Sew, using a zig zag stitch.

After that is complete, put right sides together and sew around edges. I used a 1/2"-ish  inseam. Make sure to leave a whole to stuff the stuffing in. 
Clip corners and turn right side out. Press all seams flat. Stitch a line 2" from the outside edge, making sure to keep that hole open. Now it's time to stuff the sham. 
 
Put in as much or as little as you desire.  Take the sham back to your machine and close her up. You could hand sew these together, but I was feeling lazy:o)

 
And there ya have it....well, not yet...they seem a little nekked....

 
That's much better. I just tacked on some bows, and voila...lurve it! Wait a minute, one more thing...
 
 
There we go...Gotta have the full effect;o) I hope that this has inspired you to make some quick and easy pillow shams...have fun!


Friday, February 12, 2010

Have a Great Heart Day!

I hope that you all have a wonderful Valentine's Day. I am really looking forward to mine...Try to stay warm, since everyone I know will be experiencing some form of precipitation....


Thursday, February 11, 2010

Butterfly Birthday

S.R. is going to be 2 years old in just a few short weeks. I have already been collecting stuff for the big bash. I decided to do a butterfly theme, just because...no real reason, other than I thought it would be sweet:o) I started making tissue paper pom poms today thanks to sweet Martha's help(and thanks to Deanna for pointing me in the right direction). I dreaded making them, but they were very simple. I have also cut out DOZENS of butterflies to use as decorations. I am going for a very whimsical look, and can't wait. I will definitely post the pics. Here is just a smidgen of what's to come:o)
 
The pom poms are in the background, and as you can see, there is all sorts of favors, decorations, and fun stuff. I haven't spent over $1 on anything accept the Elefun game(butterfly catching game) and it was $13.88 at Walmart.  Hubs is very proud, since I went completely over board with E's carnival party last year:o) Anyway, besides playing Elefun, there will be a Butterfly Salon where little girls get their hair done with butterfly hair bows(off which I intend to make), get their wings and a tutu skirt. Little boys will have their hair done funky and get bug wings, cape style(that I will also have to make).  I got some wooden butterfly cut-outs at the Dollar Tree that they will decorate and make into magnets. They also get to make necklaces, butterflies for girls, bugs for boys. I am so glad that my baby was almost a spring baby and that retailers always put out seasonal stuff 6 months before the actual season:o) Butterflies are very popular this year and I keep scoring every time I go out.

Wednesday, February 10, 2010

Picture Frame


Ok, I know I said that I was making this baby week, but I had to post this b/c I was so excited about it. Remember the coffee table makeover? The one I got from Goodwill for I think $7.50? Remember the ugly top that used to have glass in it? Well, we FINALLY got it finished and I am so pumped about the results. The Before.....
 
Blech! 
And the After....


 Ahhhh!
Here's how we got to the after...I have a gallon of black paint that will last me until my children go to college. Used that...2 coats. Went to Lowes and had them cut 4 panes of glass. The openings were 15x15...easy enough. Then over to Hobby Lobby. This was the expensive part. I had them cut out 4 mats with an 8x10 opening. That was $32:o( Wasn't so happy about that one, but I knew that I didn't want to put myself thru the frustration of trying to keep everything even and so I left it to the pros. Taped our sa-weet beach pictures in them...from LAST YEAR!  Next came the glazier points. You should probably put some form of backing between these and the mat board, but there just wasn't enough room, so in they went. Picture hanging wire on the back and there you have it. I love how it turned out. Now to find some cute shelves to go on either side:o)

Tuesday, February 9, 2010

Travel Changing Pad

Every diaper bag usually comes with a changing pad, so of course I had to make one. It is one of the easiest things to make...ever. I didn't take step-by-step pictures, but this one is so easy that I can just tell you how to make it.

Supplies:
-Terry cloth towel or soft fabric
-Coordinating fabric(with the diaper bag, that is)
-Double fold bias tape...the kind that is used for quilt binding
-Ribbon

How to:
I have a changing pad that came with a diaper bag that I own, so I used that as my pattern. If you don't have something like that just lying around, you can use freezer paper as your pattern. The dimensions are 23"x15"(with rounded edges). Lay your pattern on the towel, pin, and cut. Do this with the coordinating fabric as well. Put wrong sides together and baste. This helps prevent any slippage. Now for the bias tape. You will want to place your cut ribbon at one end, overlapping on either side of the pad, and then pin your bias tape all the way around. Stitch. Make sure to catch both sides of the tape....and that's it. Pretty simple, huh?